Disclaimer: SyntaxHighlighter cannot be used as a JSX component
It may happen, especially when using React in version >=18 together with TypeScript, that you encounter an error as described above. Until this library is fixed by the creator, you can work around this issue using the following solution:
import {Prism, SyntaxHighlighterProps} from 'react-syntax-highlighter';

const SyntaxHighlighter = Prism as typeof React.Component<SyntaxHighlighterProps>;

//Source
//https://github.com/react-syntax-highlighter/react-syntax-highlighter/issues/539#issuecomment-1835273980
I think I can safely say that most programmers are visual learners, and when we see code that does not have syntax colored, it may not prevent the correct reading of the code, but at least slightly makes it difficult to read. If you run a blog or make an app that displays code snippets, and you don't have syntax highlighting, then this little tutorial may be useful to you.
Prerequisites
I assume that you already have an application written in NextJS, or simply in ReactJS, in both cases the activities I will describe here will be possible. First, we need to download the react-syntax-highlighter package from the npm repository
# if you using npm
npm i react-syntax-highlighter

# if you using yarn
yarn add react-syntax-highlighter
If you use TypeScript instead of JavaScript in your project, you also need to download a package containing type definitions
# if you using npm
npm i @types/react-syntax-highlighter

# if you using yarn
yarn add @types/react-syntax-highlighter
Now we can go to the code
Displaying code with highlighted syntax
react-syntax-highlighter supports several engines, in this tutorial we will focus on the Prism.js engine, mainly because it causes less problems with JSX highlighting, but I encourage you to try other options (there is a link to the library description at the bottom of the article)
First, in the file where you want to add the highlighted code to be displayed, we need to import the library and the theme. Add this to the top of the file
import { Prism as SyntaxHighlighter } from 'react-syntax-highlighter';
import { a11yDark } from 'react-syntax-highlighter/dist/esm/styles/prism';
The first line of the code imports the module using Prism.js, and the second one imports the theme with which our code will be highlighted (the link to check how individual themes look like is at the end of the article).
Now for our code to display, we need to add the imported library to the render function. An example of such a function
const Highlight = () => {

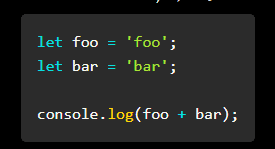
  const code = `let foo = 'foo';
  let bar = 'bar'

  console.log(foo + bar);`

  return (
      <SyntaxHighlighter language={'javascript'} style={a11yDark}>
        {code}
      </SyntaxHighlighter>
  );
};

export default Highlight;
As you can see, we added a <SyntaxHighlighter> component to the render function, then we defined a prop language that tells what language the code is in, and a prop style to which we passed the previously imported theme
In the case of NextJS 13 App route it is possible that you will need to add 'use client' to the top of the file; for the component to work properly.
And this is the effect of our work

For projects that use Sanity.io
If you use sanity.io to build the content of your website, and use the BlockContent element, then a plugin will be a useful tool. It allows you to add an element that allows you to add code and define in which language the code is written. To install it, we first download it from the repository.
# npm
npm i @sanity/code-input

# yarn
yarn add @sanity/code-input
Next, we need to add the plugin to the sanity configuration in the sanity.config.ts file
export default defineConfig({
  ...
  plugins: [
    ...
    //https://www.sanity.io/plugins/code-input
    codeInput(),
    ...
  ],
})
Technically, the plugin is already added, but we would like it to be easy to use in the BlockContent element, so in the folder where schemas sanity are, open the blockContent file and add this element to the of array
defineArrayMember({
      type: 'code'
    })
The whole thing should look like this
export default defineType({
  title: 'Block Content',
  name: 'blockContent',
  type: 'array',
  of: [
    defineArrayMember({
      title: 'Block',
      type: 'block',
      // Styles let you define what blocks can be marked up as. The default
      // set corresponds with HTML tags, but you can set any title or value
      // you want, and decide how you want to deal with it where you want to
      // use your content.
      styles: [
        {title: 'Normal', value: 'normal'},
        {title: 'H1', value: 'h1'},
        {title: 'H2', value: 'h2'},
        {title: 'H3', value: 'h3'},
        {title: 'H4', value: 'h4'},
        {title: 'Quote', value: 'blockquote'},
      ],
      lists: [{title: 'Bullet', value: 'bullet'}],
      // Marks let you mark up inline text in the Portable Text Editor
      marks: {
        // Decorators usually describe a single property – e.g. a typographic
        // preference or highlighting
        decorators: [
          {title: 'Strong', value: 'strong'},
          {title: 'Emphasis', value: 'em'},
        ],
        // Annotations can be any object structure – e.g. a link or a footnote.
        annotations: [
          {
            title: 'URL',
            name: 'link',
            type: 'object',
            fields: [
              {
                title: 'URL',
                name: 'href',
                type: 'url',
              },
            ],
          },
        ],
      },
    }),
    // You can add additional types here. Note that you can't use
    // primitive types such as 'string' and 'number' in the same array
    // as a block type.
    defineArrayMember({
      type: 'image',
      options: {hotspot: true},
      fields: [
        {
          name: 'alt',
          type: 'string',
          title: 'Alternative Text',
        }
      ]
    }),
    defineArrayMember({
      type: 'code'
    })
  ],
})
Thanks to this, we can easily add an element containing the code. Now we still need to somehow display it on the page. To display the content of BlockContent I use @portabletext/react, and I will show it on its example.
If you have an object defined for prop components for <PortableText> component, then update it with the value given below, and if you don't have it, then create a new object that will contain this value
{
  types:{
    [...]
    code: ({value}: any) =>{
      return (
        <SyntaxHighlighter language={value.language} style={a11yDark}>
          {value.code}
        </SyntaxHighlighter>
      )
    }
  }
}
And thanks to this, the code provided in sanity.io should appear to us nicely and colorfully
Useful links
https://www.npmjs.com/package/@portabletext/react
https://www.npmjs.com/package/react-syntax-highlighter
https://react-syntax-highlighter.github.io/react-syntax-highlighter/demo/
